Improve Your Model
Iterative retraining workflow: diagnose weak results, add targeted data, retrain, and compare runs to improve accuracy over time.
Your first training run is a baseline, not the final product. Production-quality models come from iteration: inspect results, identify weaknesses, add targeted data, retrain, and compare.
- A completed training run with evaluation results
- Familiarity with training metrics and advanced evaluation
The retraining loop
Each cycle through this loop should target one specific weakness. Changing multiple variables at once makes it harder to attribute improvement to the right change.
Diagnose the weakness
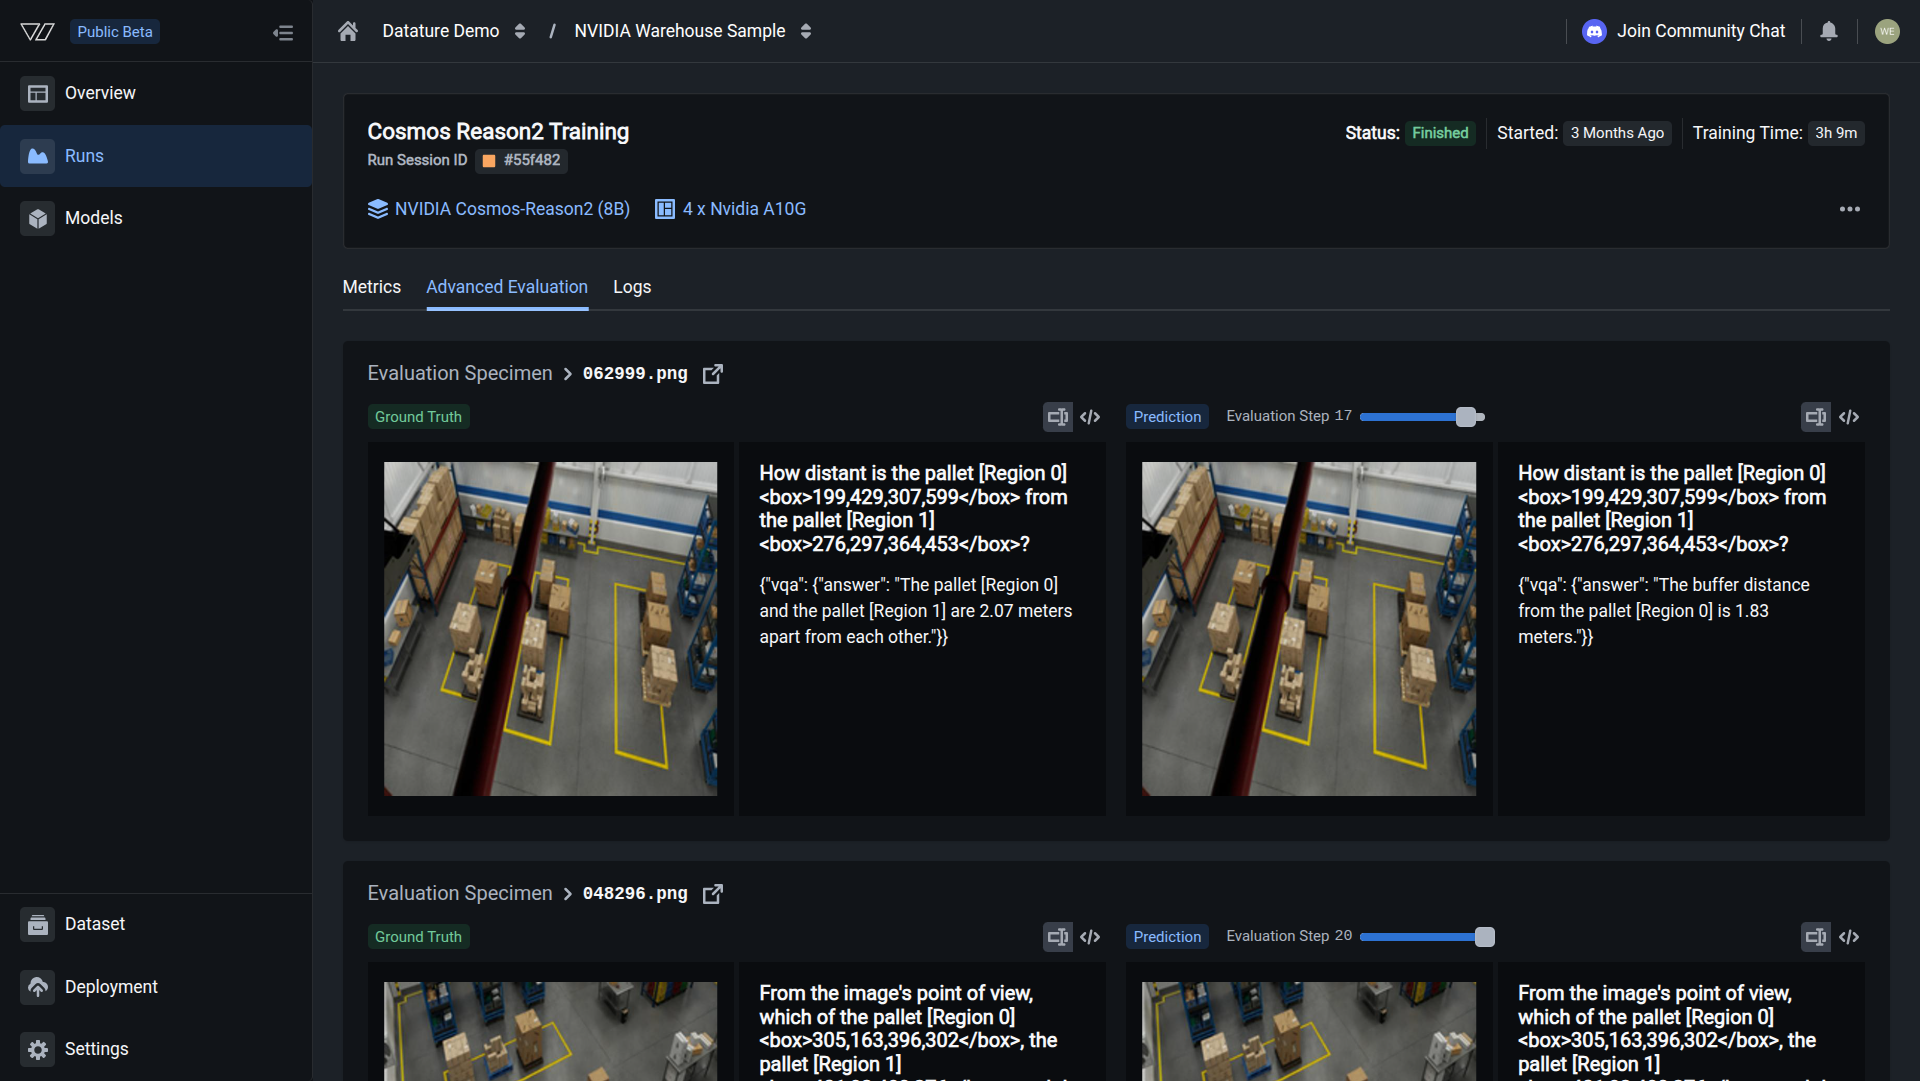
Start each iteration by reviewing your model's predictions against ground truth in Advanced Evaluation. Step through the validation images one by one and note which predictions are wrong and how they are wrong.
Common error patterns to watch for:
- Missed detections: the model fails to locate objects that are present in the image. This usually means the training data has too few examples of that object type, or the object appears at a scale or angle the model has not seen before.
- False positives: the model reports objects that do not exist. This often happens when negative examples (images without the target object) are underrepresented in the dataset.
- Wrong answers: for VQA tasks, the model returns an incorrect or hallucinated response. Check whether the training annotations contain speculative descriptions or describe things not visible in the image.
- Inconsistent format: the output structure changes between similar images. This points to a vague system prompt that does not specify the expected output format tightly enough.
Use Training Metrics to put numbers on the problem. A metric like F1 or IoU lets you track whether the next round of changes actually helped.
Add targeted data
Once you have identified the failure pattern, collect 20-50 new images that directly represent that scenario. Upload the images to your existing dataset, then upload annotations that correctly label those images.
Targeted additions work better than bulk additions. If the model misses scratches on dark surfaces, add 30 images of scratches on dark surfaces with correct annotations. Adding 200 random images and hoping the problem resolves itself wastes compute credits and dilutes the signal.
You can also use the Vi SDK to upload assets and annotations programmatically, which is faster when you have a batch of files ready on disk. If you need to annotate the new images manually, use the annotation tools in the browser or take advantage of AI-assisted annotation to speed up the process.
Retrain
With the new data in place, set up your next training run. You have two options:
- Reuse your existing workflow with the same settings. This is the default choice when you only changed the data, because it keeps every other variable constant.
- Create a new workflow if you also want to adjust model settings like learning rate, epoch count, or LoRA rank.
Keep the same model architecture and system prompt so that any improvement (or regression) can be attributed to the data change alone.
Start the training run. The run trains on the full dataset, which now includes your new additions. You can monitor its progress from the training project dashboard.
Compare runs
After the new run finishes, open the training project to see both runs listed side by side. Compare the same metrics (F1, IoU, BERTScore) you recorded during diagnosis, and step through the same validation images in Advanced Evaluation.
A successful iteration shows improvement on the targeted weakness without regression on other areas. If you see regression, the most common causes are:
- Annotation inconsistencies: new annotations follow a different labeling convention than the originals. Review them for mismatches.
- Dataset imbalance: the new images shifted the class distribution. Add a few more examples of the classes that regressed to rebalance.
- Overfitting to new data: with very small additions (under 10 images), the model may overfit. Add more varied examples of the same scenario.
If you need to roll back, you can always kill the new run or delete it and return to the previous model.
Common iteration strategies
Retraining with the Vi SDK
You can script the retraining loop with the Vi SDK. The examples below break the workflow into individual steps.
After the run completes, compare results in the training project dashboard or download both models and run inference side-by-side with ViModel.
When to stop iterating
Stop adding data and retraining when:
- Accuracy meets your production threshold: define this number before you start (e.g., F1 > 0.90 on your validation set)
- Returns diminish: the last 2-3 rounds each improved accuracy by less than 1%
- The errors are annotation quality issues, not model issues: if the model's "mistakes" match ambiguous ground truth, the problem is your labels, not the model
Next steps
Updated 4 months ago