Configure Training Settings
Configure advanced settings, hardware, and validation before starting your training run.
Configure your training run settings before launching model fine-tuning. The training configuration wizard guides you through four essential steps: advanced settings, hardware selection, dataset validation, and final review.
PrerequisitesBefore configuring training settings, ensure you have:
- A workflow configured with dataset, model, and system prompt
- Access to sufficient Compute Credits for your GPU selection
- Understanding of your dataset configuration
Access training configuration
From your workflow canvas, click Run Training at the bottom right to open the training configuration dialog.
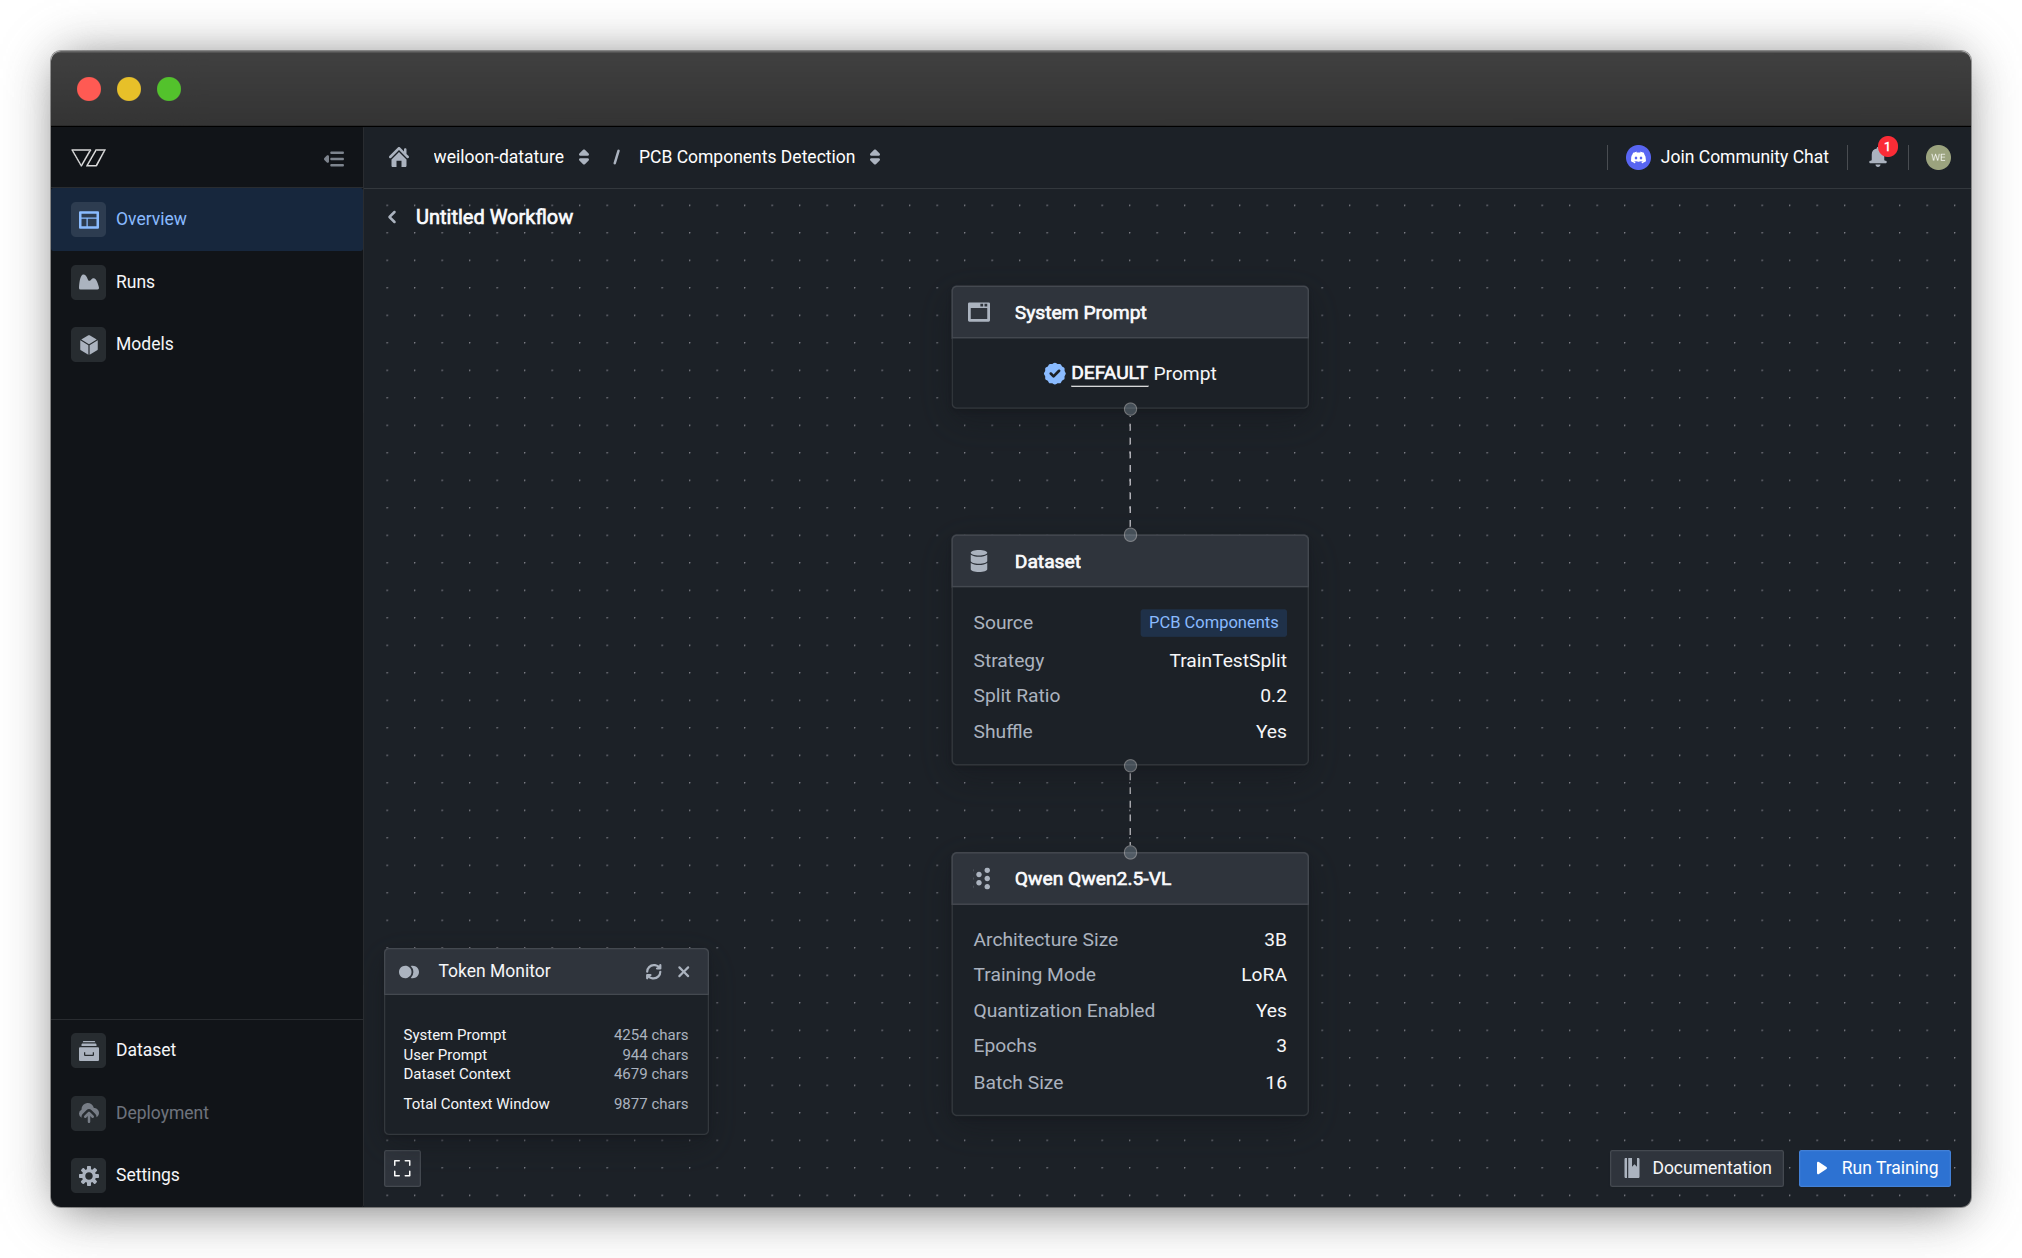
The configuration wizard presents four sequential steps that you must complete before starting training.
Step 1: Advanced Settings
Configure checkpoint and evaluation settings that control how your model is saved and monitored during training.
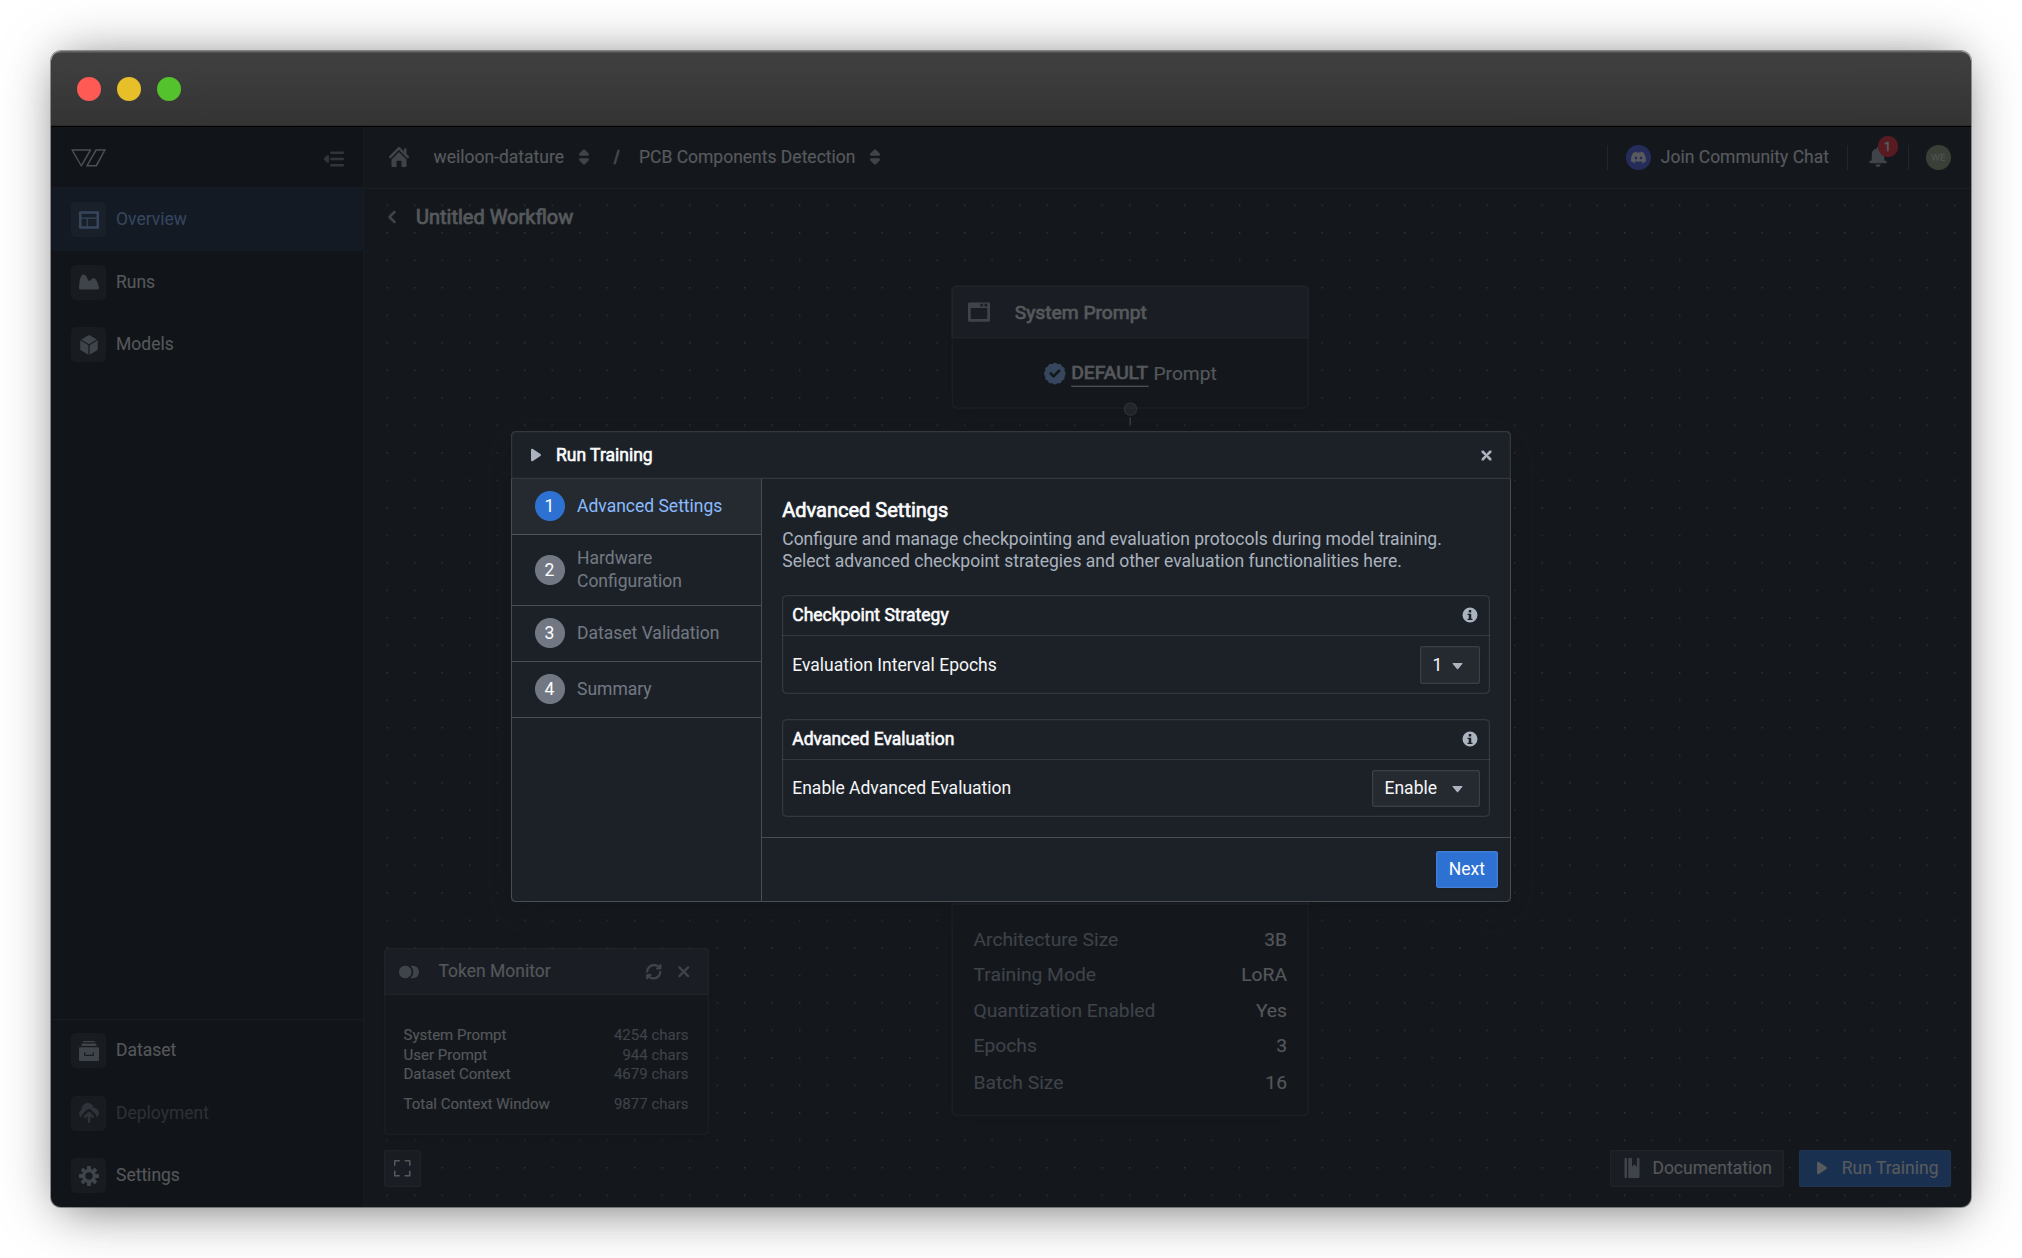
Checkpoint Strategy
Evaluation Interval Epochs — Controls how frequently the training process creates evaluation checkpoints.
| Setting | Behavior | Best for |
|---|---|---|
| 1 epoch | Evaluate after every epoch | Short training runs (3-10 epochs), critical monitoring |
| 2-5 epochs | Evaluate every few epochs | Standard training (10-50 epochs), balanced monitoring |
| 10+ epochs | Evaluate less frequently | Long training runs (100+ epochs), reduced overhead |
Learn more about checkpoint strategies →
Advanced Evaluation
Enable Advanced Evaluation — Enables detailed evaluation metrics and preview visualizations during training.
| Option | Description | Impact |
|---|---|---|
| Enable | Generate visual previews at each checkpoint | Higher GPU memory usage, slower checkpointing |
| Disable | Basic metrics only, no preview generation | Faster checkpointing, lower memory footprint |
Recommendation: Enable Advanced Evaluation for initial experiments to understand model behavior. Disable for production runs where speed is critical.
View complete checkpoint configuration options →
Click Next to continue to hardware configuration.
Step 2: Hardware Configuration
Select your compute infrastructure and GPU resources for training. Your choices directly impact training speed, cost, and model capacity.
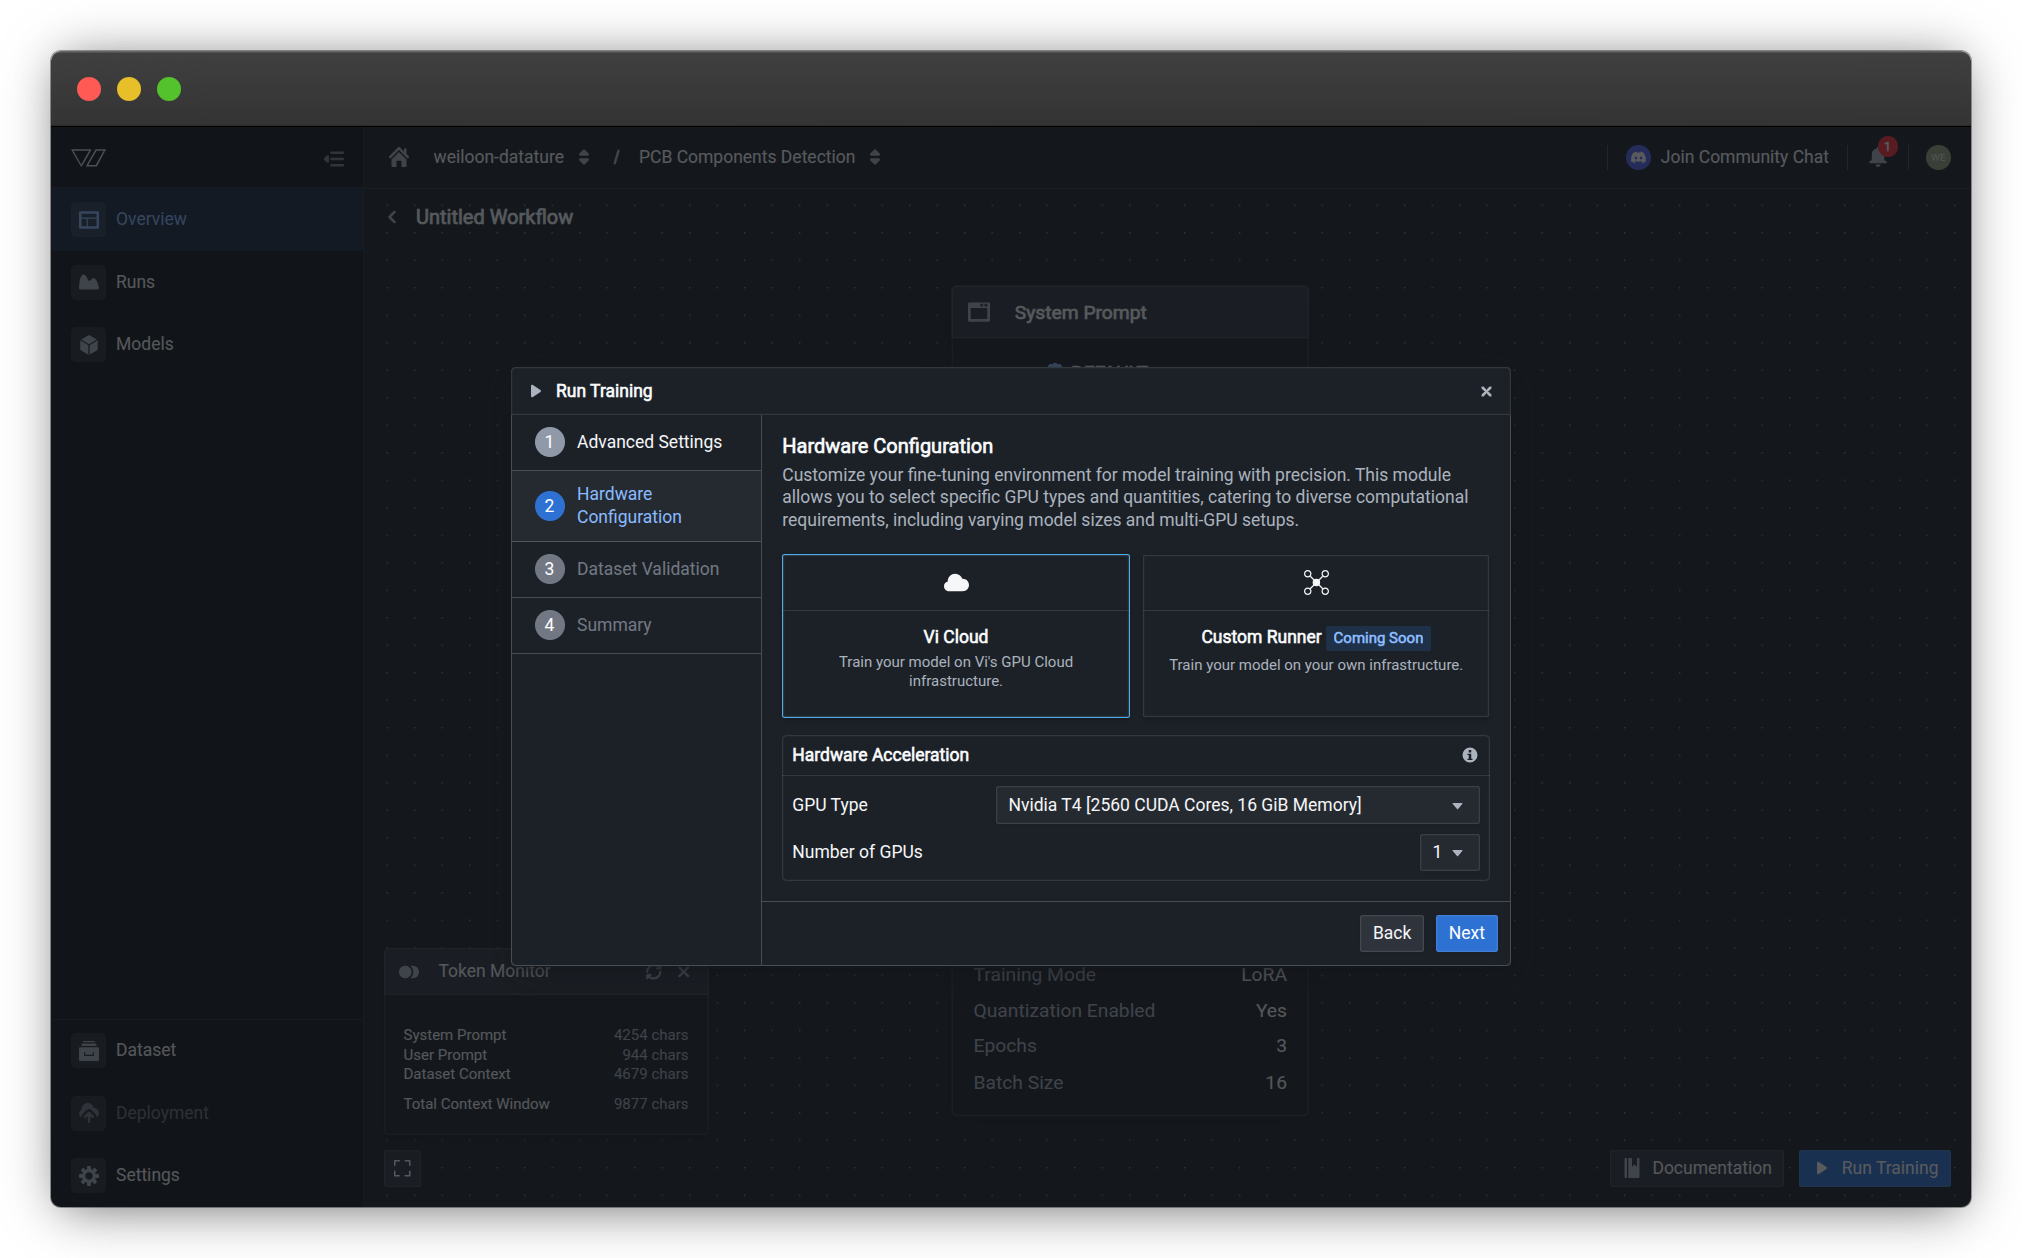
Infrastructure Options
Choose where your training will run:
| Infrastructure | Description | Availability |
|---|---|---|
| Vi Cloud | Train on Vi's managed GPU infrastructure with automatic scaling and monitoring | Available now |
| Custom Runner | Train on your own infrastructure with full control over environment and resources | Coming soon |
For most users: Vi Cloud provides the fastest setup with no infrastructure management required.
GPU Type
Select the GPU model that matches your performance requirements and budget. Different GPU types have different:
- Memory capacity (VRAM) — Determines maximum batch size and model size
- Compute performance — Affects training speed
- Cost multiplier — Higher-performance GPUs consume more Compute Credits per minute
| GPU Tier | Example Models | Best For |
|---|---|---|
| Entry-level | NVIDIA T4 | Small models, experimentation, tight budgets |
| Balanced | NVIDIA L4, A10G | Standard VLM training, production workflows |
| High-performance | NVIDIA A100 (40GB/80GB) | Large models, faster iteration, distributed training |
| Cutting-edge | NVIDIA H100, H200, B200 | Maximum performance, ultra-large models, research |
View complete GPU specifications and pricing →
Number of GPUs
Choose how many GPUs to allocate for distributed training. Multi-GPU setups can significantly reduce training time for large models and datasets.
| Configuration | Training Speed | Use Case |
|---|---|---|
| 1 GPU | Baseline | Small to medium models, single experiments |
| 2-4 GPUs | 1.8-3.5× faster | Standard distributed training, faster iteration |
| 8+ GPUs | 6-12× faster | Large-scale training, production pipelines |
Compute Credit calculation: Multi-GPU configurations have specific usage multipliers. A 4× A10G setup consumes 10.0 credits per minute (not 4× 2.5).
Cost Estimation
Usage Multiplier displays the Compute Credits consumed per minute for your selected configuration:
Example calculation:
  4× NVIDIA A10G GPUs → 10.0 credits/minute
  Estimated training time: 45 minutes
  Total cost: 450 Compute Credits
Plan your Compute Credit usage →
Click Next to validate your dataset.
Step 3: Dataset Validation
The platform automatically validates your dataset to ensure it meets training requirements.
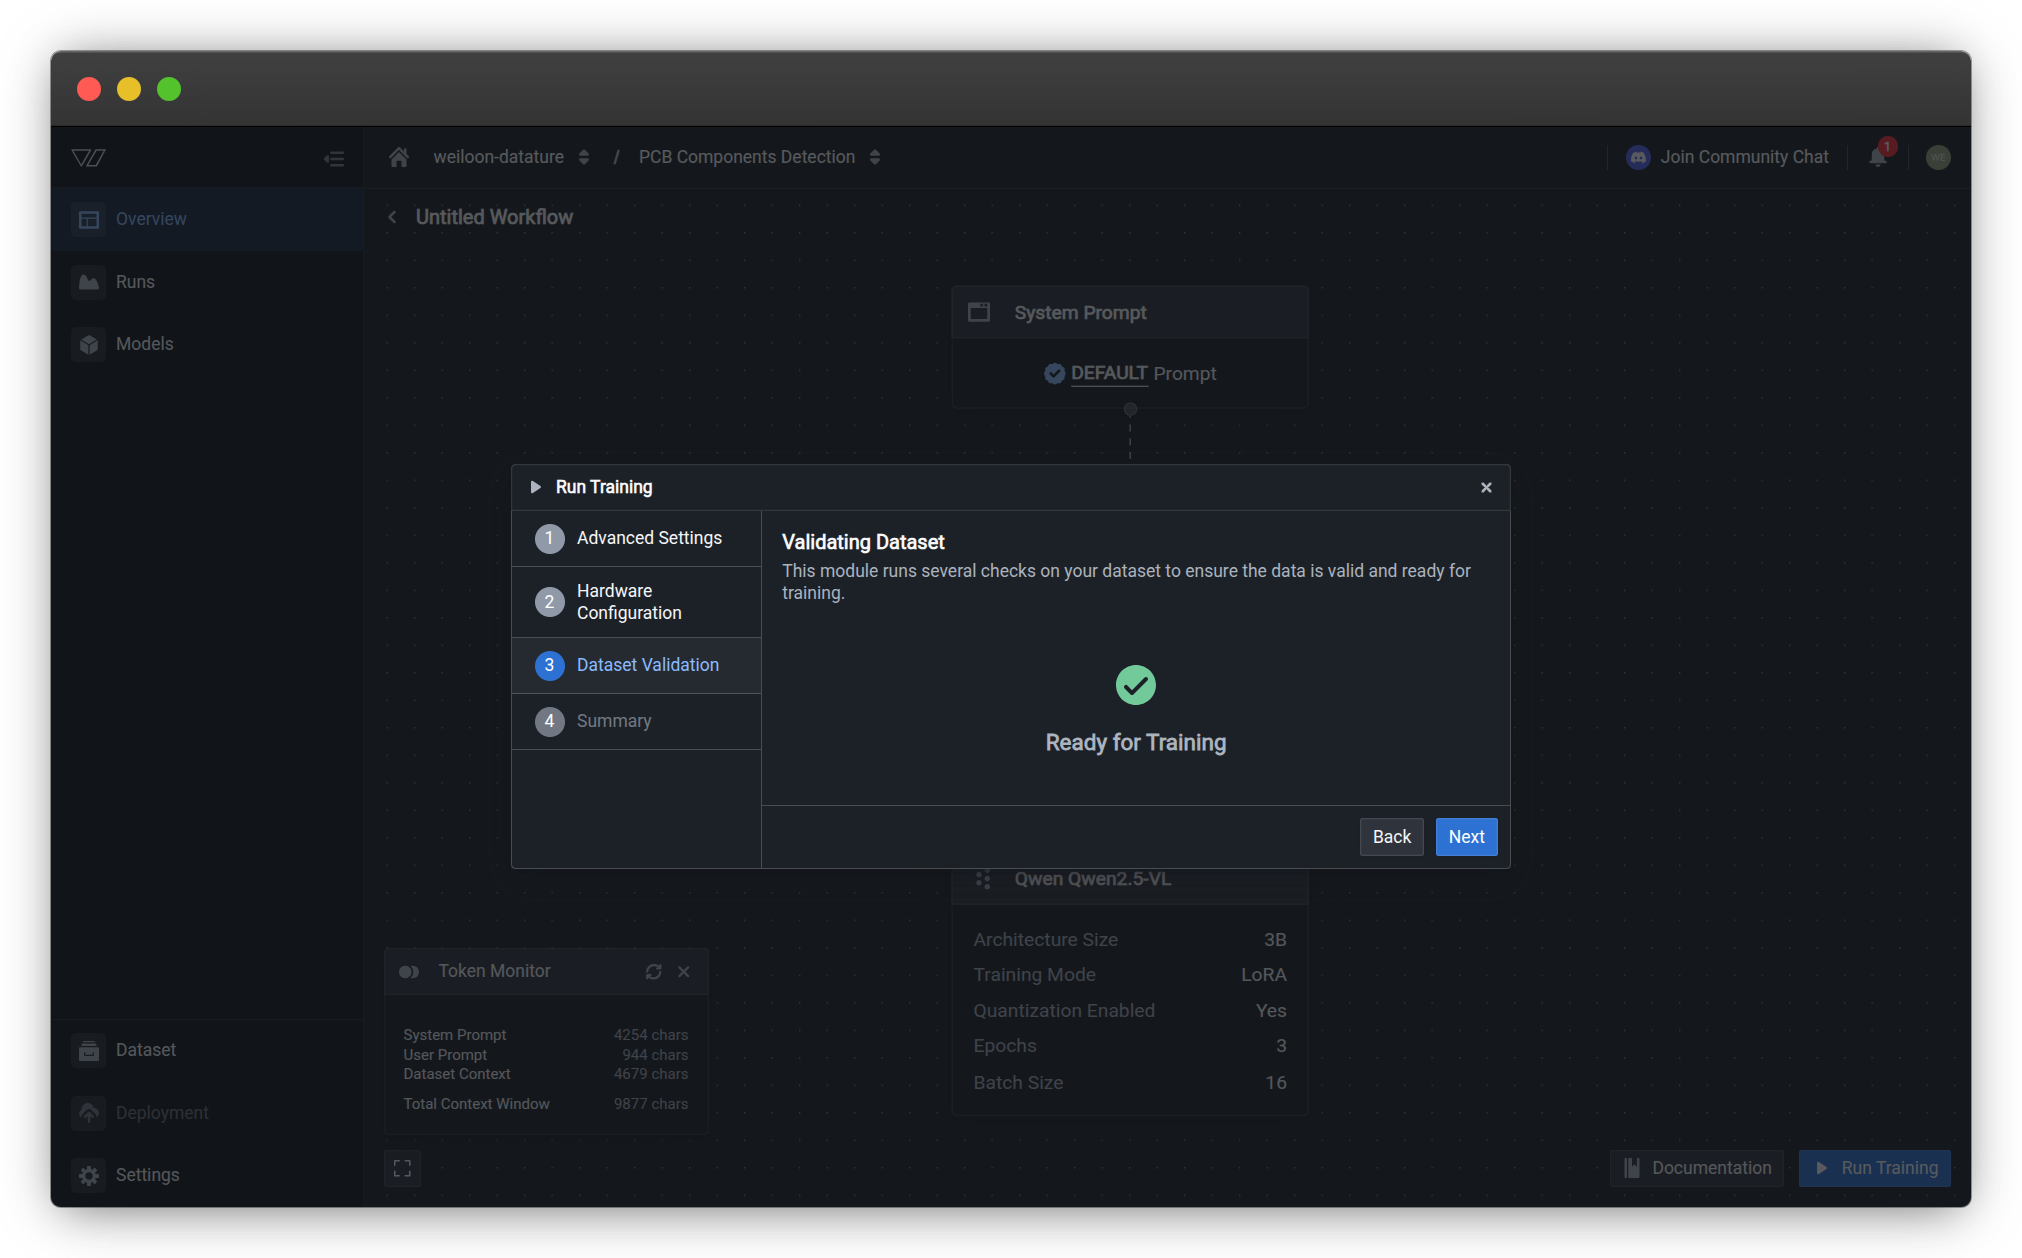
Validation Checks
The system performs several checks on your configured dataset:
| Check | Purpose | Common Issues |
|---|---|---|
| Asset availability | Verify all training assets are accessible | Missing or deleted assets |
| Annotation completeness | Ensure annotations exist for training split | Empty training set |
| Format compatibility | Check annotation format matches model requirements | Incorrect annotation types |
| Split configuration | Validate train/validation/test splits | Invalid split ratios |
Validation Results
| Status | Meaning | Action |
|---|---|---|
| Ready for Training | All checks passed, dataset is valid | Proceed to summary |
| Warnings | Non-critical issues detected | Review warnings, optionally fix |
| Errors | Critical issues preventing training | Fix issues before proceeding |
Critical validation errors must be resolved before training can start. Common errors include missing assets, empty annotation sets, or invalid split configurations.
If issues are found:
- Review the error or warning details
- Click Back to exit the configuration
- Fix the identified issues in your dataset or workflow
- Return and restart the training configuration
Click Next when validation shows "Ready for Training".
Step 4: Review Summary
Review your complete training configuration before launching the run.
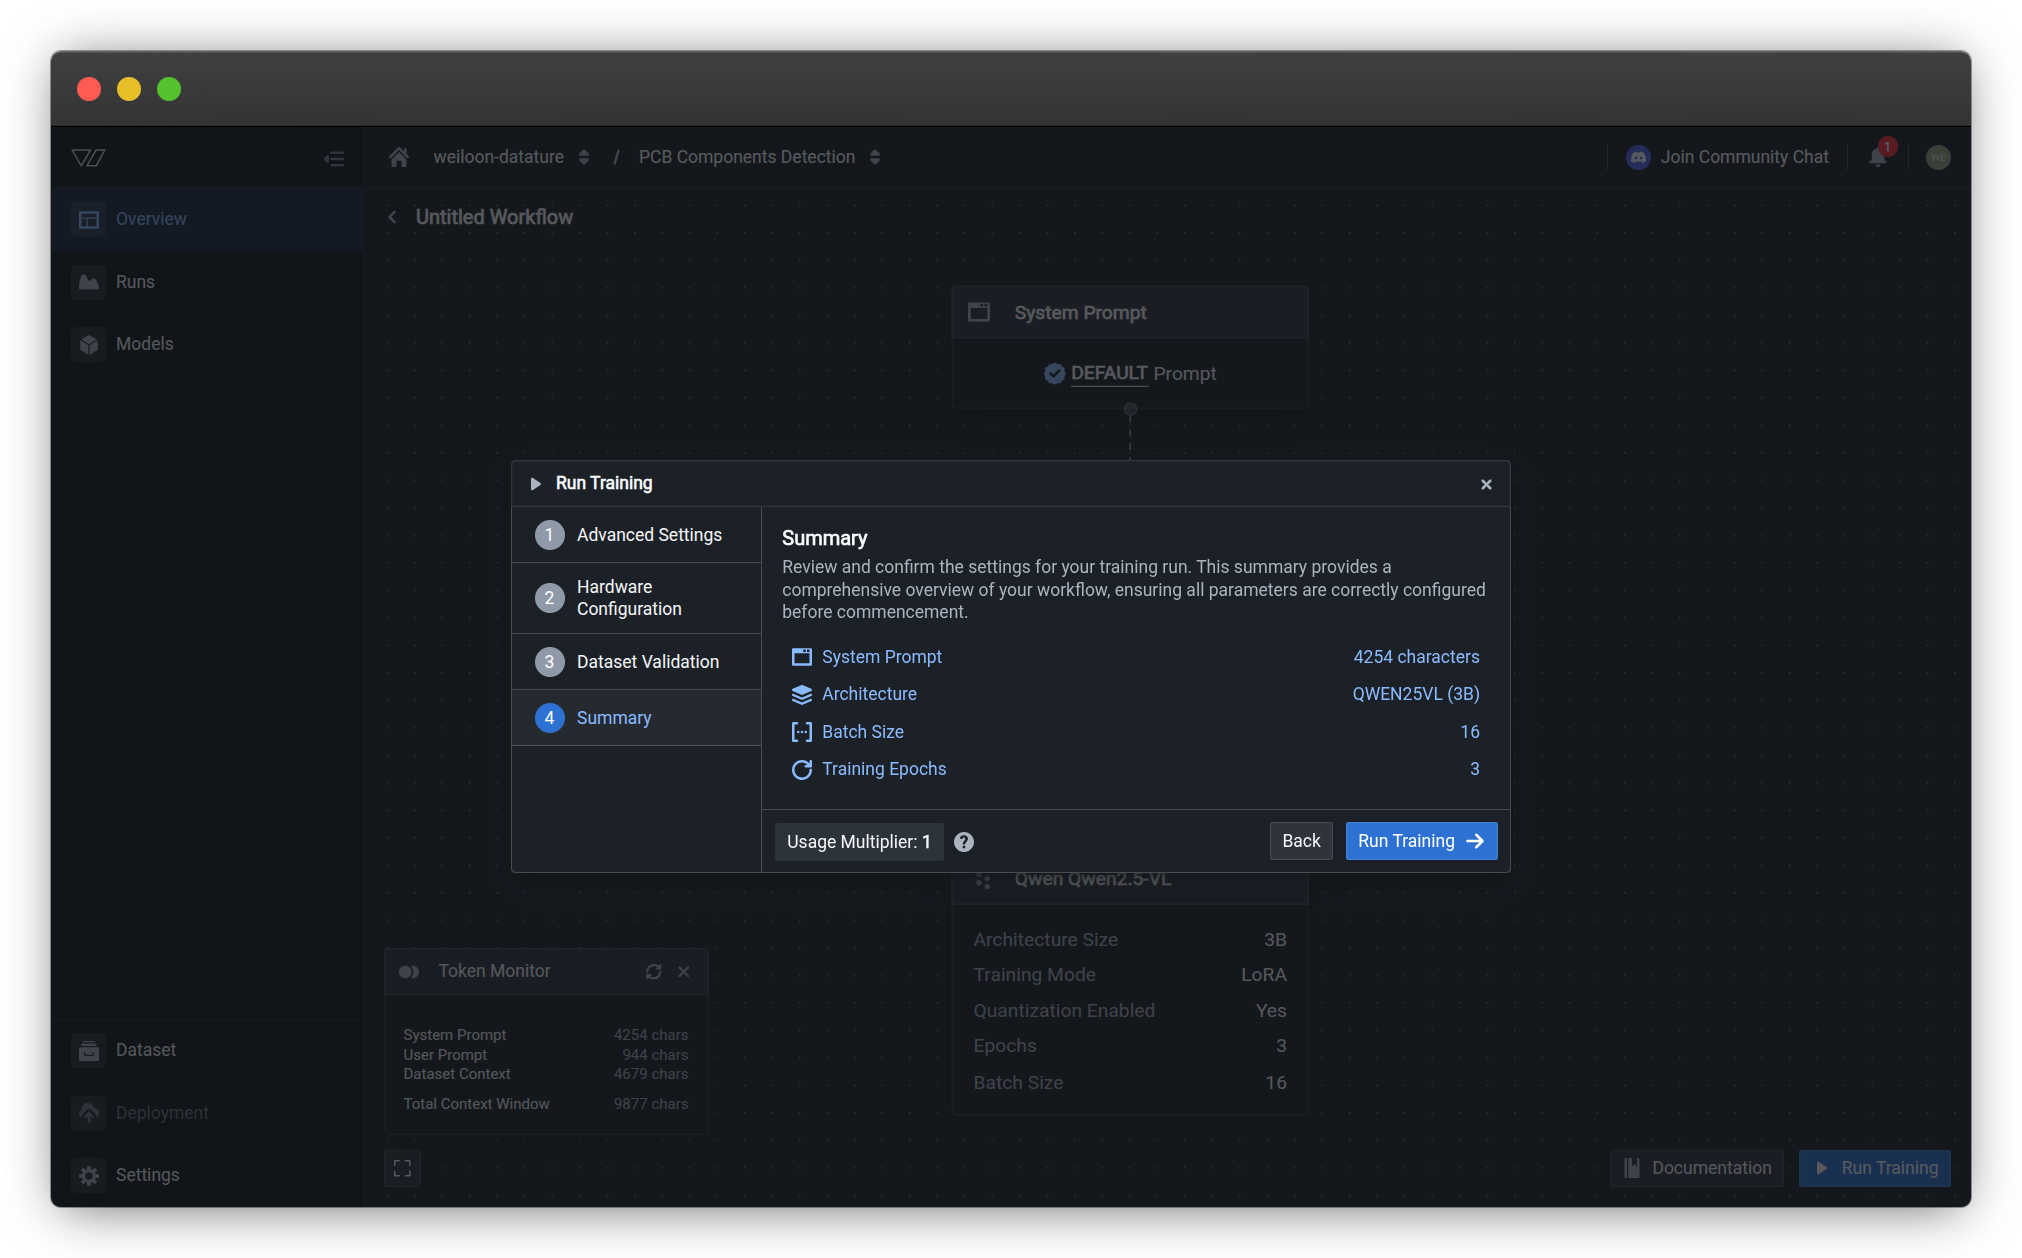
Summary Information
The summary displays key configuration details:
| Component | Description | Source |
|---|---|---|
| System Prompt | Character count of your prompt configuration | Configure your system prompt |
| Architecture | Selected VLM model architecture and size | Configure your model |
| Batch Size | Number of samples processed per training step | Model settings |
| Training Epochs | Number of complete passes through training data | Training settings |
| Usage Multiplier | Compute Credits consumed per minute | Resource usage |
Pre-launch Checklist
Before clicking Run Training, verify:
- System prompt matches your use case requirements
- Model architecture is appropriate for your dataset size
- Batch size fits within selected GPU memory (VRAM)
- Training epochs provide sufficient learning time
- Usage multiplier aligns with your Compute Credit budget
Launch Training
Click Run Training to start the training run. The system will:
- Allocate your selected GPU resources
- Load your dataset and model configuration
- Initialize training with your specified settings
- Begin the fine-tuning process
Training runs in the background. You can safely close the browser or navigate away. The platform will notify you when training completes.
Learn how to monitor your training run →
Configuration Best Practices
Start conservative, then scale
For your first training run:
- Use 1 GPU (typically 1× T4 or L4) to validate configuration
- Enable Advanced Evaluation to understand model behavior
- Set checkpointing to 1-2 epochs for frequent feedback
- Monitor resource usage and training progress
After validation:
- Scale to multi-GPU for faster training
- Disable Advanced Evaluation if speed is priority
- Adjust checkpoint frequency based on training duration
- Optimize batch size for GPU memory utilization
Match hardware to model size
Model size considerations:
| Architecture Size | Minimum GPU | Recommended GPU | Batch Size |
|---|---|---|---|
| 0.5-3B params | T4 (16 GB) | L4 (24 GB) | 8-16 |
| 3-7B params | A10G (24 GB) | A100 (40 GB) | 4-8 |
| 7-13B params | A100 (40 GB) | A100 (80 GB) | 2-4 |
| 13B+ params | A100 (80 GB) | H100 (80 GB) | 1-2 |
Out of memory errors? Reduce batch size or upgrade to GPU with more VRAM.
Optimize checkpoint frequency
Balance monitoring needs with training efficiency:
Frequent checkpoints (1-2 epochs):
- ✅ Detailed progress tracking
- ✅ More recovery points if training fails
- ✅ Better for short training runs (< 10 epochs)
- ❌ Slower training due to evaluation overhead
Infrequent checkpoints (5-10 epochs):
- ✅ Faster training with less overhead
- ✅ Better for long runs (50+ epochs)
- ❌ Less granular progress visibility
- ❌ Fewer recovery points
Plan for compute costs
Before starting training:
- Estimate duration: Similar models with similar datasets provide baseline
- Calculate credits:
Usage Multiplier × Estimated Minutes = Total Credits - Add buffer: Include 20-30% buffer for unexpected training time
- Verify budget: Ensure sufficient Compute Credits available
Example calculation:
Configuration: 4× A100 (40GB) → 16.0 credits/minute
Estimated time: 2 hours (120 minutes)
Buffer (25%): 30 minutes

Total credits needed: 16.0 × 150 = 2,400 creditsCommon Questions
Can I change settings after training starts?
No. Training configuration is locked when the run starts. If you need different settings:
- Cancel the current run
- Return to your workflow
- Click Run Training to configure a new run with updated settings
Tip: Test configurations with short runs (few epochs) before committing to long training sessions.
What happens if I run out of Compute Credits during training?
Training will pause when your Compute Credits are depleted:
- The run enters a "paused" state
- You receive a notification
- Training resumes automatically when credits are available
- No progress is lost—training continues from the last checkpoint
To avoid interruptions:
- Monitor your resource usage before starting
- Purchase additional Compute Credits if needed
- Use smaller GPU configurations for longer availability
How do I choose between 1 GPU and multiple GPUs?
Use 1 GPU when:
- Testing new configurations or hyperparameters
- Training small models (< 3B parameters)
- Working with limited Compute Credit budget
- Dataset is small (< 1,000 images)
Use multiple GPUs when:
- Training large models (7B+ parameters)
- Working with large datasets (10,000+ images)
- Speed is critical for iteration velocity
- You have sufficient Compute Credit budget
Performance scaling: Multi-GPU training doesn't scale linearly. 4 GPUs are typically 2.5-3.5× faster than 1 GPU, not 4× faster.
What's the difference between checkpointing and saving?
Checkpointing:
- Occurs during training at specified intervals (every N epochs)
- Creates recovery points for interrupted training
- Generates evaluation metrics and visualizations
- Temporary until training completes
Final model saving:
- Occurs when training completes successfully
- Creates the deployable model artifact
- Includes final weights and configuration
- Permanent and available for deployment
Can I use the same GPU configuration for different models?
Maybe. GPU requirements depend on:
Model architecture size:
- 0.5-1B parameter models: T4 or L4 sufficient
- 3-7B parameter models: A10G or A100 (40GB) recommended
- 7-13B parameter models: A100 (80GB) or H100 required
Batch size:
- Larger batch sizes require more VRAM
- Reduce batch size if you encounter out-of-memory errors
Dataset complexity:
- High-resolution images need more memory
- Complex annotations increase memory usage
Rule of thumb: Start with the GPU configuration from similar successful runs. Upgrade if you encounter memory errors.
Why is my estimated training time different from actual time?
Training time estimates are based on historical data and may vary due to:
Factors that increase training time:
- Large batch sizes require more computation per step
- Complex model architectures have slower forward/backward passes
- Advanced Evaluation enabled adds checkpoint overhead
- High-resolution images increase processing time
Factors that decrease training time:
- Multi-GPU configurations (but not linearly)
- Smaller datasets finish epochs faster
- Disabled Advanced Evaluation reduces overhead
Tip: Track actual training time for your specific configurations to improve future estimates.
Troubleshooting
Training won't start - insufficient resources
Issue: Cannot start training due to resource constraints.
Potential causes:
- Insufficient Compute Credits for selected GPU configuration
- All GPUs of selected type currently in use
- Account limits exceeded
Solutions:
-
Check Compute Credits:
- View your resource usage
- Calculate required credits:
Usage Multiplier × Estimated Duration - Purchase additional credits or wait for monthly renewal
-
Try different GPU type:
- Select an alternative GPU with similar capabilities
- Consider using fewer GPUs (e.g., 1× instead of 4×)
-
Wait and retry:
- GPU availability varies; retry after a few minutes
- Schedule training during off-peak hours if possible
Dataset validation fails
Issue: Validation step shows errors preventing training.
Common validation errors:
| Error | Cause | Solution |
|---|---|---|
| Missing assets | Assets deleted after workflow configuration | Re-upload missing assets |
| Empty training split | No assets assigned to training split | Adjust split configuration |
| Invalid annotations | Annotation format incompatible with model | Fix annotation format |
| Insufficient data | Training set too small for selected model | Add more annotated assets |
To resolve:
- Note the specific error message from validation
- Click Back to exit configuration
- Fix the underlying issue in your dataset or workflow
- Restart the configuration and validate again
Configuration resets after going back
Issue: Changes made in earlier steps are lost when navigating back.
Why this happens:
- Configuration wizard maintains session state
- Browser back button may cause state loss
- Session timeout resets configuration
To avoid:
- Use the Back button within the wizard, not browser back
- Complete configuration in one session
- Don't leave configuration dialog idle for extended periods
If configuration is lost:
- Your workflow settings are preserved
- Only the training run configuration needs to be redone
- Previous selections may auto-populate based on workflow defaults
Can't see my preferred GPU type
Issue: Desired GPU model not available in dropdown.
Reasons for unavailability:
- Plan restrictions: Some GPU types require specific subscription plans
- Region limitations: Certain GPUs may be region-specific
- Temporary unavailability: High-demand GPUs may be temporarily unavailable
- Beta access: Cutting-edge GPUs (H200, B200) may require beta enrollment
Solutions:
- Upgrade plan: Contact sales for Enterprise plans with more GPU options
- Use available alternative: Select similar GPU with comparable performance
- Join waitlist: Request access to beta GPU types
- Check documentation: Verify GPU is generally available
Next Steps
After configuring your training settings:
Track progress with real-time metrics and visualizations
View, cancel, or delete training runs
Assess performance after training completes
Related resources
- Create a workflow — Configure dataset, model, and system prompt before training
- Train a model — Complete training workflow overview
- Resource usage — Understanding Compute Credits and GPU pricing
- Monitor a run — Track training progress in real-time
- Kill a run — Stop training runs early if needed
- Evaluate a model — Assess model performance after training
- Configure your model — Select model architecture and settings
- Manage runs — Monitor, kill, and delete runs
- Quickstart — End-to-end training tutorial
- Create a training project — Set up training environment
- Vi SDK — Python SDK for programmatic training
- Team settings — Manage organization settings
Need help?
We're here to support your VLMOps journey. Reach out through any of these channels:
Updated 3 months ago